SD2IEC Revisited

When I discovered the MMC2IEC / SD2IEC project by chance back in 2009, it made me dig up again my soldering iron and electronic components after many years of disuse. I built myself one of those devices on a prototyping board and had a lot of fun doing so. It was the first time that I got involved with micro controllers and I learned a lot in the process.

Now, many years and projects later, I was looking for an excuse to try out KiCAD and to learn how to design my own boards using it. I had already ordered a small PCB I found on the net as a proof-of-concept to see if the Gerber files I produce would result in working boards. When they turned out just as expected I was eager to create something myself. This was the perfect opportunity to revisit the subject and make myself a brand new SD2IEC.

I wanted the design to be based on Shadowolf’s latest version but also make my own additions and changes:

  • The board should be able to tap into the cassette port of the C64 for power supply.
  • It should be board for external use with proper connectors just like my first build.
  • All components should be cheap to buy from Chinese suppliers.

So, this is the first prototype of what I came up with. I call it the “SD2IEC pluggable”:

Continue reading

Making a XU1541 Cable

I have been documenting interesting software and programming related findings in my own private Wiki for a few years now. This turned out to be really useful in many cases, especially on topics that I would run into only very infrequently. Most of these notes would not be of any interest to anybody else but me, while a few of them might be worth offering to a wider audience. All it would take would be some nice presentation and a little effort to write things down in whole sentences. Or so I thought.

IMG_4934b.JPG

The finished XU1541 adapter.

When I began tinkering with electronics again, I soon decided this would be a great excuse to start my own blog, sharing my progress. After my initial enthusiasm had worn off, I soon realized that I had somewhat underestimated this project. It takes a good deal of time and effort to write things down in whole sentences and to present them nicely. As a result, there are a few projects that I finished this year that I failed to put up here so far. Most likely, I have forgotten a lot of interesting details by now. But I’ll try and summarize what I do remember.

Continue reading

Making a XA1541 Cable

As you might have read in my previous post, I retrieved  my old Commodore hardware from the attic and found it still working. Even most of the 5 1/4″ floppy disks that I inserted into one of the squeaking 1541 drives seemed still readable. So, I decided this might be the last chance to save those very early lines of code from oblivion that I had written so many years ago. Not that it was really worth it, it’s mostly a matter of principle to not let a single bit of code get lost if I can help it. To convert what was still readable to d64 disk images, I first needed to make a suitable adapter cable.

The XA1541 seemed like a good choice to start. It’s an adapter to connect the Commodore 1541 disk drive to the parallel port of a PC. While there are other solutions, the XA1541 seemed easy enough to build and reported to work with most (all?) parallel ports found in today’s PCs. If there is a parallel port to be found at all. We’ll cover that in a later post on making a XU1541 cable, though.

Also, there are excellent instructions by Stefan Uhlmann on how to make one of these. The page is available in German only but very well illustrated.

All that is needed are two connectors (obviously), a length of shielded wire, four resistors, and four transistors to drive the interface. Just as Stefan suggested, I wanted to fit the active components onto a small piece of prototyping board inside the D-sub casing of the parallel port connector. The first step is to cut the board so that it will fit into the casing while still leaving as much room for the components as possible.

xa-1541-step1

Fitting the board into the connector’s casing.

The board fits smoothly between the two rows of the D-sub connector, and the connector is then soldered directly onto the board. The lead-wire spacing of the connector does not match that of the prototyping board, but that doesn’t matter. Only the four left most leads 14-17 of the connector, marked with a green box in the picture, must not be shorted. The other leads 18-25 on this side get all connected to GND anyway.

Solder the d-sub connector to the board.

Do not shorten pins 14 – 17.

Next, I placed the four resistors and transistors on the board and fixed their wires with soldering points.

It really helped and saved time to have Stefan’s images as a guideline. Since I placed the components exactly where Stefan did, all I needed to do then was to spread solder onto the copper side of the board until the shiny pattern looked like the one on Stefan’s picture.

Finally, the the leads from the shielded wire are attached and everything gets stuffed into the D-sub connector’s casing. The DIN connector fitting into the Commodore IEC serial bus is soldered to the other end of the cable and we’re all done.

The XA1541 is ready to connect our trusty 1541 drive to our PC. Using a great piece of code called OpenCBM (formerly known as cbm4linux) we are now able to access the data from the 5 1/4 inch disks.

Prologue

My soldering iron, my collection of spare electronic components and related tools had been stored away in the basement for years. Way back, I really enjoyed tinkering with those, but when I decided to go for the software engineering aspects of computer science I somewhat lost interest. So many things to try and so little time to spare. Also, I have been lacking the room to set up a suitable work space.

My old soldering iron.

As with many other IT people of my age,  my first “real” computer was a second-hand Commodore 64 that my parents bought for me in the mid-eighties. I absolutely loved that machine and spent countless hours in front of it, teaching myself it’s Basic and Assembler dialects. Even though I bricked the C64 a few years later, trying to install a self-designed relay card and replaced it with a C128, I could not bear parting from the Commodore hardware. So I stored the computer and it’s peripherals in card board boxes in the attic many years ago.

Spring 2009: By chance I stumbled across Ben Heckendorn’s blog where he describes how he created his Commodore 64 original hardware laptop. I really admired his work and I really wanted such a portable for myself! Ben integrated a 1541-III DTV into his construction to replace the traditional 1541 floppy disk drive, which of course would not have fit into the laptop. Using the 1541-III connected to the normal serial bus of the C64, it allows you to mount and read d64 disk images from ordinary MMC or SD memory cards. Awesome!

Googling around, I discovered that by now there are actually several different solutions that offer this feature. There are the afore mentioned “cousins” 1541-III DTV and 1541-DTV, both based on PIC micro-controllers. The design has later been ported by Lars Pontoppidan to an AVR micro-controller, which he called the MMC2IEC. The MMC2IEC hardware and firmware has been extended and improved by a bunch of other people and evolved into the SD2IEC. Finally, there is the 1541 Ultimate that reportedly does a good job of fully emulating the original 1541. As a result, it should be able to support even copy protected games and other software that comes with their own fast-loader routines. Unfortunately, the 1541 Ultimate is also rather expensive.

C64 start screen

AntaBaka has done a great job of collecting and summarizing the evolution of the SD2IEC on his page, which is available in German only, though. It was when I read that page that I decided I wanted to build one of those SD2IEC myself. It would be a nice project to play around with the AVR micro-controllers that I kept reading about for some time on sites like Hack-a-Day and Makezine. And it would be a great excuse to dig out the old stuff I had hidden in basements and attics.

I also liked the idea of trying to save my old Basic and Assembler programs from oblivion, petty as they might be. My old discs had been been stored in the attic along with the hardware. They had to endure extreme heat in summer and cold temperature in winter for about 15 years. Would there be anything left to save? Or would even the disk drives be decayed and broken by now? To cut at least that long story short: my trusty old C128 was working fine when I pulled it from it’s card box. And the two 1541 were happily loading the randomly chosen disks I tried them with.

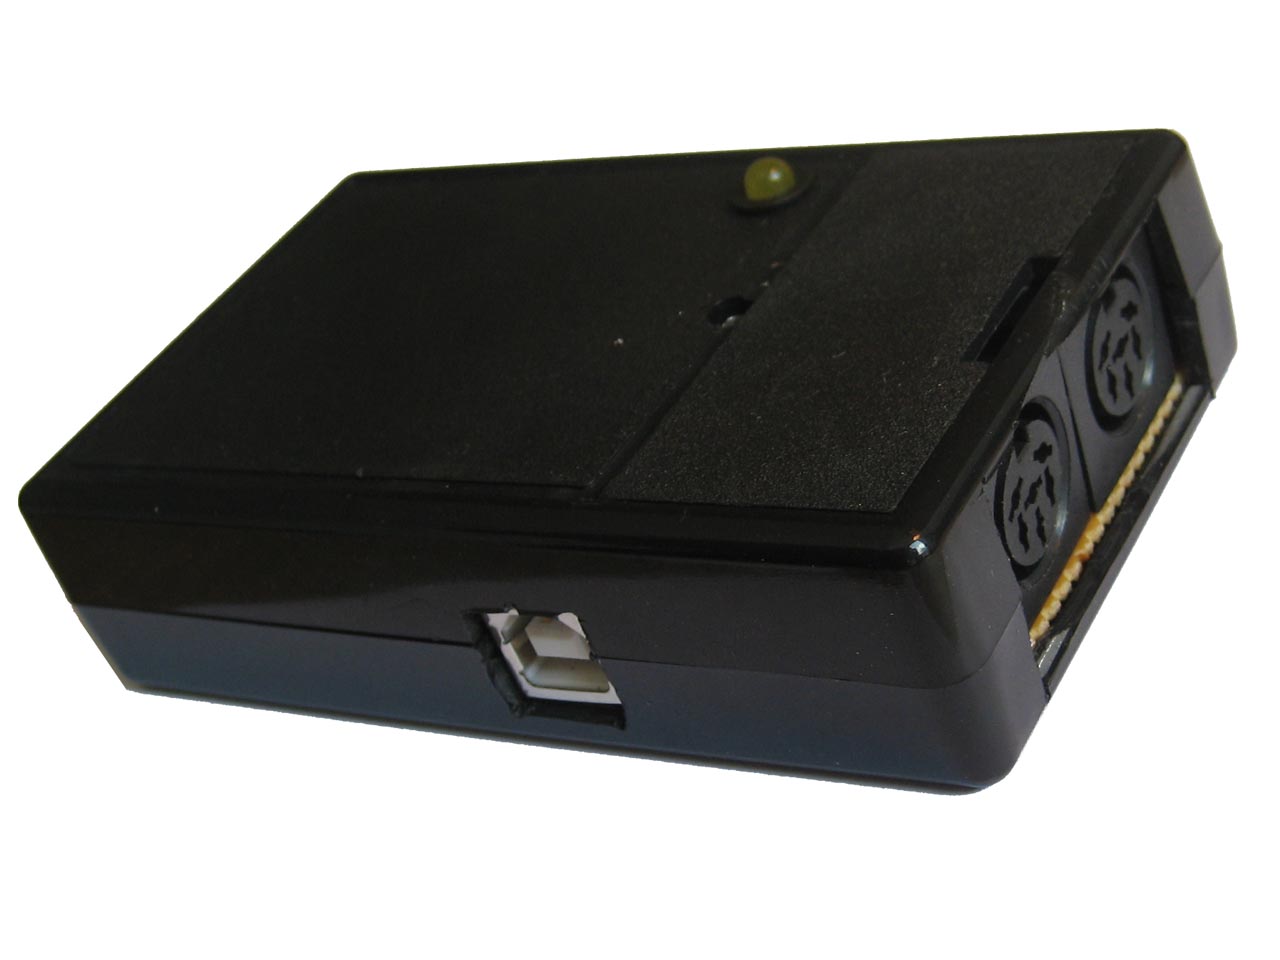
So, the first step would be to get the data from those discs and store it in d64 disk images on my PC’s hard drive. There are a bunch of different cables and adapters that can be used to accomplish this. The xu1541 appealed most to me because it is “legacy free” (what irony!), bridging between the USB port and the Commodore IEC serial port. Also, it is based on an AVR micro-controller.

But at first, I was a little afraid I could be wanting more than I could handle. So I decided to revive my tinkering in electronics with the simpler design of the xa1541 adapter which connects the 1541 disk drive to the parallel port of the PC. We’ll hear about that another day.